Blog
How to Train an Ideogram 4 LoRA

Mickael
mediapixel team
Training an Ideogram 4 LoRA locally is possible on a 12GB GPU, but the workflow needs to be realistic.
This article documents the low-VRAM route I use with AI Toolkit, the official Ideogram 4 FP8 model, structured JSON captions, and validation inside ComfyUI.
The goal is not to build a perfect universal training recipe. The goal is more practical: show a workflow that can actually run on hardware such as an RTX 3060 12GB, without pretending that every training setup needs a 24GB or 48GB GPU.
To keep the examples public and easy to understand, I will use two generic game-art concepts:
- a sci-fi military buggy LoRA;
- a green armored supersoldier LoRA;
- a final validation prompt that combines both concepts in one scene.
The example concepts are original training examples for this tutorial. They are not official assets and are not affiliated with any existing game franchise.
Note: AI-generated images are not a replacement for 3D work, but they can be useful during pre-production. They can help place an asset inside a believable environment, explore design variations, test different visual styles, or create blueprint-like references before modeling. Used this way, AI becomes a fast concept and iteration tool for 3D asset creation.
Hardware and settings
The reference setup for this workflow is:
GPU: NVIDIA RTX 3060 12GB
Resolution: 768 px
Batch size: 1
Gradient accumulation: 1
LoRA rank / alpha: 16 / 16
Learning rate: 5e-5
Optimizer: adamw8bit
Training dtype: bf16
Save dtype: float16
Text encoder training: disabled
Sampling during training: disabled
On this setup, a validated Ideogram 4 FP8 training run reached roughly 11 to 12 seconds per step at 768 px.
That does not mean every dataset will behave exactly the same way. But it gives a useful baseline: with the right configuration, local Ideogram 4 LoRA training is not limited to very high-end GPUs.
Tools used
The main tools are:
- AI Toolkit for LoRA training;
- Ideogram 4 FP8 as the base model for training;
- ComfyUI for inference and validation;
- Comfy-Org Ideogram 4 repackaged files for the ComfyUI side;
- Qwen3-VL 8B FP8 as the text encoder in the ComfyUI workflow;
- PowerShell for launching and monitoring the training job.
Useful links:
- AI Toolkit: https://github.com/ostris/ai-toolkit
- Ideogram 4 FP8: https://huggingface.co/ideogram-ai/ideogram-4-fp8
- ComfyUI Ideogram 4 files: https://huggingface.co/Comfy-Org/Ideogram-4
- ComfyUI Qwen3-VL files: https://huggingface.co/Comfy-Org/Qwen3-VL
Before using the model, check the license and access conditions on the official Hugging Face page. At the time of writing, the Ideogram 4 FP8 repository requires accepting the model gate before downloading the files.
Download the tutorial files
All companion files for this tutorial are available in the GitHub assets repository:
Download the Ideogram 4 LoRA tutorial files
The folder includes:
-
ai-toolkit/config/mp_scifi_buggy_aitk_500steps.yaml
The main low-VRAM AI Toolkit config used for the buggy LoRA example. -
ai-toolkit/config/mp_power_armor_rank16_aitk_800steps.yaml
A stronger rank 16 power armor LoRA config, useful when the armor is the main concept. -
ai-toolkit/config/mp_power_armor_rank8_aitk_800steps.yaml
A lighter rank 8 power armor LoRA config, useful when stacking it with another LoRA. -
scripts/run_mp_scifi_buggy_aitk_500steps.ps1
A PowerShell launcher that runs AI Toolkit and writes a timestamped log file. -
workflows/ideogram4_lora_test_workflow.json
A ComfyUI workflow for testing the trained Ideogram 4 LoRA.
The example paths are Windows paths and assume this local structure:
C:\ai-toolkit
C:\ai-toolkit\models\ideogram-4-fp8
C:\ideogram4_lora_training\mp_scifi_buggy\images
C:\ideogram4_lora_training\mp_scifi_buggy\output_aitk

If your folders are different, update the paths in the YAML config and PowerShell script before running the training.
Dataset strategy
For this tutorial, I would not start with a huge mixed dataset.
A small focused LoRA is easier to debug than a large broad one. If a LoRA is supposed to learn a vehicle, the dataset should consistently show that vehicle idea. If a LoRA is supposed to learn an armored character, the dataset should consistently show that character idea.
For the public examples, I use two triggers:
mp_scifi_buggy
mp_power_armor
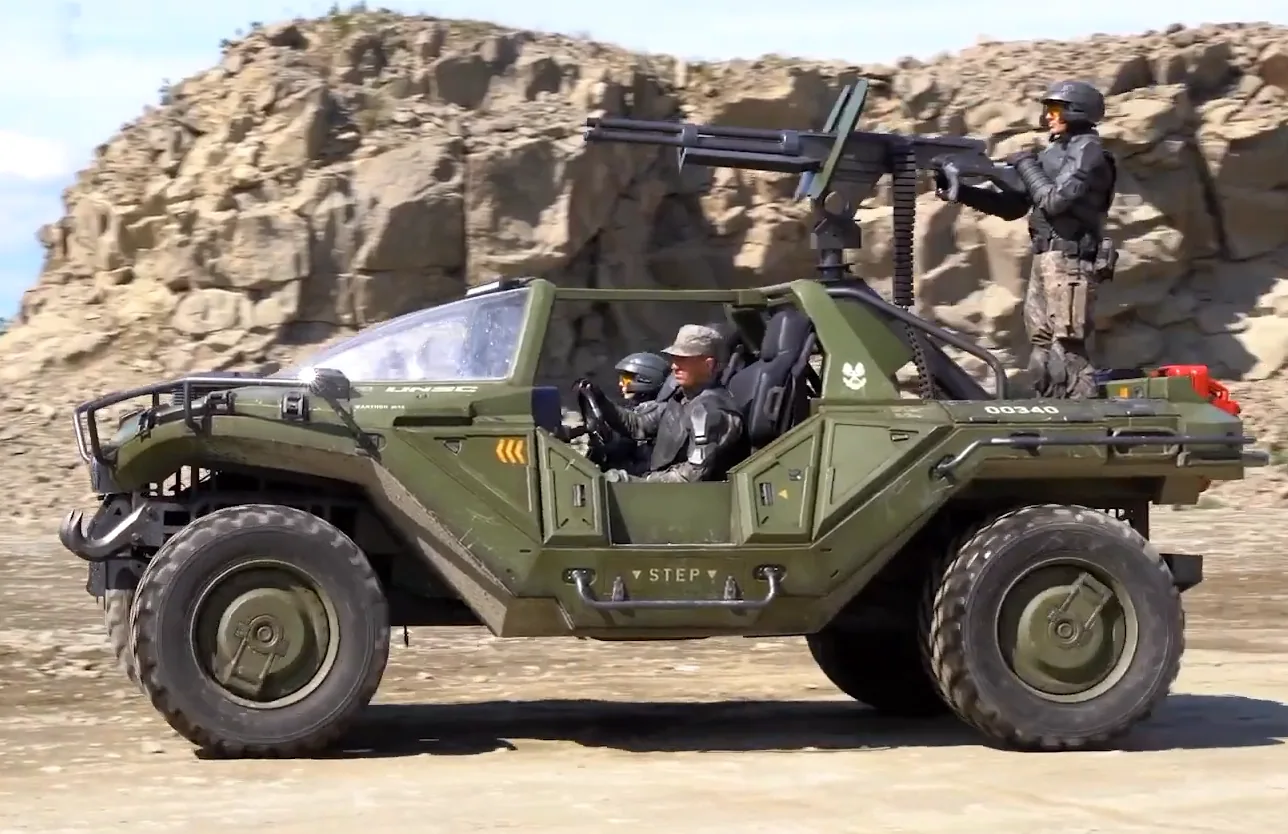
The first trigger is for a rugged sci-fi off-road buggy inspired by classic game vehicle design.
The second trigger is for a futuristic armored supersoldier.
A practical starting point for a small concept LoRA is:
6 to 12 images
768 px training resolution
rank 16 / alpha 16
batch size 1
500 to 1000 steps for a focused concept test
For a broader LoRA, you can increase the dataset size and steps. But for this tutorial, small focused concepts are easier to explain and evaluate.
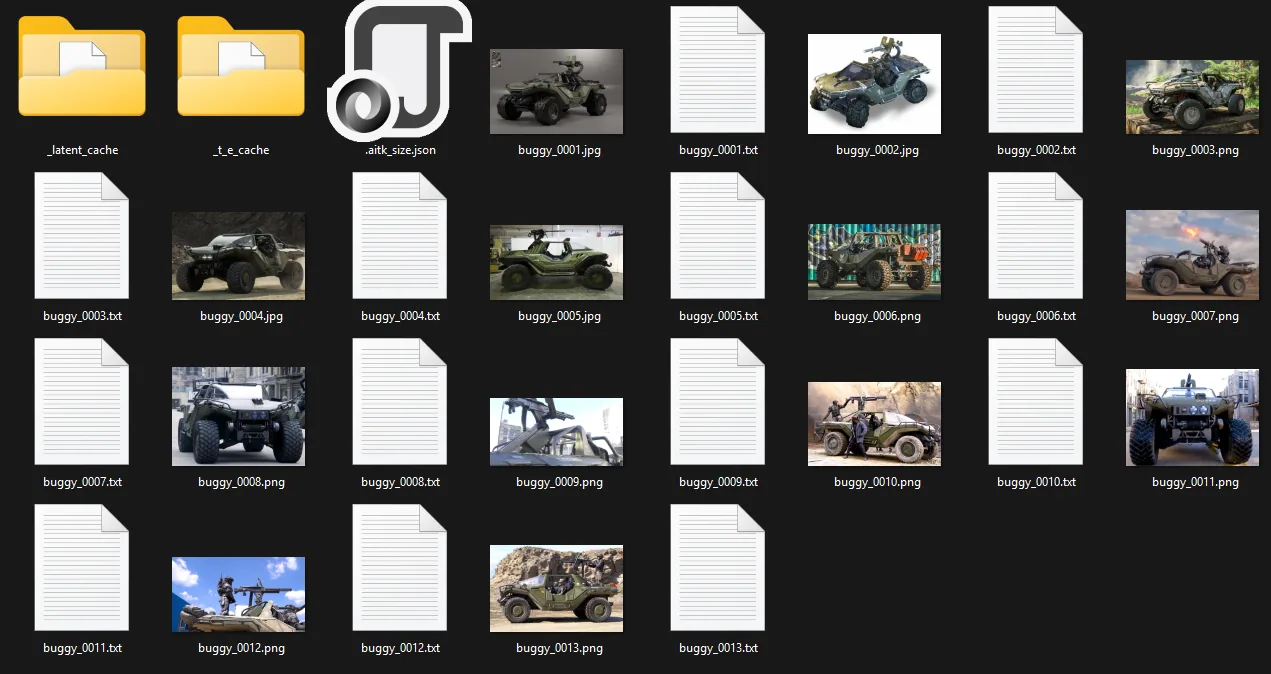
Recommended dataset structure
A clean dataset should use matching image and caption files.
Example:
ideogram4_lora_training/
├─ mp_scifi_buggy/
│  ├─ images/
│  │  ├─ buggy_0001.png
│  │  ├─ buggy_0001.txt
│  │  ├─ buggy_0002.png
│  │  ├─ buggy_0002.txt
│  │  └─ ...
│  ├─ validation_prompts/
│  │  └─ test_scifi_buggy.json
│  └─ output_aitk/
├─ mp_power_armor/
│  ├─ images/
│  │  ├─ armor_0001.png
│  │  ├─ armor_0001.txt
│  │  ├─ armor_0002.png
│  │  ├─ armor_0002.txt
│  │  └─ ...
│  ├─ validation_prompts/
│  │  └─ test_power_armor.json
│  └─ output_aitk/
└─ shared_validation/
   └─ test_buggy_and_armor_scene.json
Each .png has a matching .txt file with the same base name.
The .txt file contains raw JSON. It should not contain Markdown fences.
Example caption: sci-fi buggy
In the .txt file, this should be stored as raw JSON
{
  "high_level_description": "A detailed studio render of a futuristic sci-fi military buggy. The vehicle is an olive-green armored off-road combat buggy with a low angular body, open side cockpit, heavy black roll cage, oversized rugged tires, reinforced suspension, and a rear-mounted rotating gun turret. The design features modular armor panels, black mechanical undercarriage parts, red suspension springs, front tow hooks, compact headlights, military-style decals, and a practical all-terrain silhouette, mp_scifi_buggy.",
  "style_description": {
    "aesthetics": "sci-fi military vehicle reference, mp_scifi_buggy",
    "lighting": "soft studio lighting with realistic reflections",
    "medium": "3D render",
    "art_style": "realistic hard-surface sci-fi vehicle render"
  },
  "compositional_deconstruction": {
    "background": "A neutral gray studio backdrop with soft lighting, a color calibration chart, and small material reference spheres in the upper-left corner, keeping the focus on the sci-fi buggy model.",
    "elements": [
      {
        "type": "obj",
        "desc": "The mp_scifi_buggy is shown in a front three-quarter view, emphasizing its low angular silhouette, wide wheelbase, and armored military design."
      },
      {
        "type": "obj",
        "desc": "The olive-green armored body has sloped front panels, modular side plating, black lower trim, and subtle military-style white decals on the side panels."
      },
      {
        "type": "obj",
        "desc": "Four oversized black off-road tires with deep tread support the vehicle, giving it a rugged all-terrain stance."
      },
      {
        "type": "obj",
        "desc": "The front section includes compact rectangular headlights, black tow hooks, exposed suspension parts, and red coil springs visible beneath the armored hood."
      },
      {
        "type": "obj",
        "desc": "The cockpit is partially open, with dark frame bars, visible seats, and a protective black roll cage integrated into the vehicle body."
      },
      {
        "type": "obj",
        "desc": "A rear-mounted rotating turret sits above the cockpit area, fitted with a compact rotary machine gun and an arcing ammunition belt feed."
      },
      {
        "type": "obj",
        "desc": "The render highlights realistic hard-surface modeling with beveled armor edges, panel seams, latch details, bolts, dark glass, rubber textures, and matte metal surfaces."
      }
    ]
  }
}
JSON captions for Ideogram 4
This guide assumes that you are already familiar with the JSON prompt structure used in my previous article:
JSON Prompts for Ideogram 4 in ComfyUI
Here, the same structure is used for LoRA captions: one global description, one style block, one background description, and one or more element descriptions.
Ideogram 4 responds well to structured JSON captions. For this workflow, I use the same general structure for training captions and validation prompts:
{
  "high_level_description": "...",
  "style_description": {
    "aesthetics": "...",
    "lighting": "...",
    "medium": "...",
    "art_style": "...",
    "color_palette": ["#...", "#...", "#..."]
  },
  "compositional_deconstruction": {
    "background": "...",
    "elements": [
      {
        "type": "obj",
        "desc": "..."
      }
    ]
  }
}
For training captions, the most important rule is consistency.
The trigger token should appear naturally in the caption. It can appear in high_level_description, in an element description, or both.
For example:
mp_scifi_buggy
should always refer to the same visual concept: a rugged sci-fi off-road buggy with a clear silhouette, large wheels, military body panels, visible suspension, and open-frame construction.
The caption should not simply say:
A cool sci-fi vehicle.
That is too vague.
It should describe what the model needs to learn:
A rugged sci-fi off-road buggy with oversized tires, open-frame roll cage, military body panels, elevated suspension, front bumper, and compact battlefield vehicle proportions, mp_scifi_buggy.
Installing AI Toolkit
Prerequisites
Before running the installation commands, make sure these tools are installed on Windows:
-
Windows Terminal or PowerShell
Used to run the commands. -
Git for Windows
Required forgit cloneandgit submodule update. -
Python 3.10 or newer
Required forpython -m venv venvand for running AI Toolkit.
During installation, enable Add python.exe to PATH. -
NVIDIA GPU driver
Required for CUDA/PyTorch GPU acceleration.
Optional but useful if dependency installation fails:
- Microsoft Visual Studio Build Tools
- CMake
After installation, check that Git and Python are available:
git --version
python --version
If both commands return a version number, you can continue with the installation.
Example Windows installation:
cd C:\
git clone https://github.com/ostris/ai-toolkit.git ai-toolkit
cd C:\ai-toolkit
git submodule update --init --recursive
python -m venv venv
.\venv\Scripts\python.exe -m pip install --upgrade pip
.\venv\Scripts\pip.exe install -r requirements.txt
AI Toolkit evolves quickly. If the official README changes, follow the current official installation instructions first, then keep the low-VRAM principles from this article.
If python is not recognized, try:
py --version
If py works but python does not, Python is installed but not correctly added to the PATH.
Downloading Ideogram 4 FP8
Install the Hugging Face CLI:
cd C:\ai-toolkit
.\venv\Scripts\pip.exe install -U huggingface_hub
Then download the gated model after accepting the license conditions on Hugging Face:
.\venv\Scripts\huggingface-cli.exe download ideogram-ai/ideogram-4-fp8 --local-dir C:\ai-toolkit\models\ideogram-4-fp8
The expected local structure is:
C:\ai-toolkit\models\ideogram-4-fp8
C:\ai-toolkit\models\ideogram-4-fp8\text_encoder
In the AI Toolkit config, the model block will point to that folder:
model:
  name_or_path: "C:/ai-toolkit/models/ideogram-4-fp8"
  arch: "ideogram4"
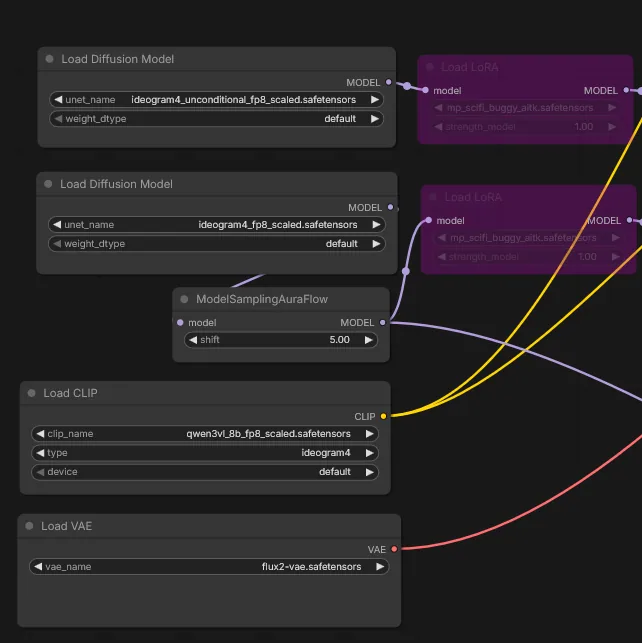
Downloading the ComfyUI files
For inference and validation in ComfyUI, use the Comfy-Org repackaged files.
From:
https://huggingface.co/Comfy-Org/Ideogram-4
Place the files here:
ComfyUI\models\diffusion_models\ideogram4_fp8_scaled.safetensors
ComfyUI\models\diffusion_models\ideogram4_unconditional_fp8_scaled.safetensors
ComfyUI\models\text_encoders\qwen3vl_8b_fp8_scaled.safetensors
ComfyUI\models\vae\flux2-vae.safetensors
With Stability Matrix, the equivalent paths may look like this:
I:\StabilityMatrix\Models\DiffusionModels
I:\StabilityMatrix\Models\TextEncoders
I:\StabilityMatrix\Models\VAE
Low-VRAM AI Toolkit config
Here is the essential part of the AI Toolkit config used for the mp_scifi_buggy example.
The yaml config file must be created as :
C:\ai-toolkit\config\mp_scifi_buggy_aitk_500steps.yaml
You can duplicate it for another LoRA, by changing:
config.nametraining_foldertrigger_word- dataset
folder_path - optional metadata fields such as
meta.datasetandmeta.trigger_token
job: extension
config:
  name: "mp_scifi_buggy_aitk"
  process:
    - type: "sd_trainer"
      training_folder: "C:/ideogram4_lora_training/mp_scifi_buggy/output_aitk"
      device: cuda:0
      trigger_word: "mp_scifi_buggy"

      network:
        type: "lora"
        linear: 16
        linear_alpha: 16

      save:
        dtype: float16
        save_every: 250
        max_step_saves_to_keep: 10
        save_format: "safetensors"
        push_to_hub: false

      datasets:
        - folder_path: "C:/ideogram4_lora_training/mp_scifi_buggy/images"
          caption_ext: "txt"
          caption_dropout_rate: 0.05
          shuffle_tokens: false
          cache_latents_to_disk: true
          cache_text_embeddings: true
          resolution: [768]

      train:
        batch_size: 1
        gradient_accumulation_steps: 1
        steps: 500
        train_unet: true
        train_text_encoder: false
        gradient_checkpointing: true
        cache_text_embeddings: true
        disable_sampling: true
        noise_scheduler: "flowmatch"
        optimizer: "adamw8bit"
        lr: 0.0001
        dtype: bf16

      model:
        name_or_path: "C:/ai-toolkit/models/ideogram-4-fp8"
        arch: "ideogram4"
        quantize: true
        quantize_te: true
        low_vram: true
        layer_offloading: true
        layer_offloading_text_encoder_percent: 95
        layer_offloading_transformer_percent: 95
        model_kwargs:
          text_encoder_path: "C:/ai-toolkit/models/ideogram-4-fp8/text_encoder"
          max_text_length: 2048
The most important low-VRAM settings are:
batch_size: 1
train_text_encoder: false
gradient_checkpointing: true
cache_text_embeddings: true
cache_latents_to_disk: true
quantize: true
quantize_te: true
low_vram: true
layer_offloading: true
disable_sampling: true
These settings are useful because:
batch_size: 1keeps VRAM usage predictable.train_text_encoder: falseavoids training the large Qwen text encoder.gradient_checkpointing: truereduces memory usage during backpropagation.cache_text_embeddings: trueavoids recomputing text embeddings after the first cache pass.cache_latents_to_disk: trueavoids repeatedly encoding images.quantize: trueandquantize_te: truereduce memory pressure.layer_offloading: trueallows parts of the model to move between CPU and GPU.disable_sampling: trueprevents validation sampling from slowing down or blocking the training run.
For a focused LoRA with around 6 to 12 images, 500 steps is a reasonable first test value.
A useful way to think about training length is:
steps per image = total training steps / number of training images
For example:
500 steps / 13 images  = about 38 steps per image
1000 steps / 13 images = about 77 steps per image
1250 steps / 13 images = about 96 steps per image
1500 steps / 13 images = about 115 steps per image
For a small object-focused LoRA like mp_scifi_buggy, 500 steps is a good first checkpoint, while 1000 to 1500 steps can produce a much stronger result.
For a general style or broad concept LoRA with many images, you usually do not need the same steps-per-image ratio. A broad LoRA should stay more flexible, while a small object LoRA can be trained more aggressively.
As a rough guide:
General LoRA with many images      : 15-30 steps per image
Focused object or outfit LoRA      : 60-120 steps per image
Very specific character/object LoRA: 80-150 steps per image
Quick diagnostic run               : 50-250 total steps
Training too long can cause overfitting. Common signs are:
- the LoRA becomes too rigid
- composition variety decreases
- the same angles or poses repeat too often
- small details from the dataset appear where they should not
- generated images become too close to the training references
To estimate training time, first measure your average seconds per step.
On my RTX 3060 12 GB setup, this AI Toolkit + Ideogram 4 FP8 configuration runs at roughly:
11-12 seconds per step at 768 px
Then use:
training time in minutes = steps * seconds_per_step / 60
training time in hours   = steps * seconds_per_step / 3600
At 11.5 seconds/step, the approximate times are:
250 steps  = about 48 minutes
500 steps  = about 1 h 36
1000 steps = about 3 h 12
1500 steps = about 4 h 48
3000 steps = about 9 h 35
In practice, add some margin for model loading, latent caching, text embedding caching, checkpoint saving, and restarts.
For this setup, training in blocks of 250 steps is comfortable: it is short enough to compare results often, but long enough to produce visible changes.
Other GPUs will not scale perfectly linearly, because this workflow also depends on CPU offloading, disk caching, PyTorch/CUDA versions, driver versions, and how much of the model stays in VRAM.
Still, for this exact low-VRAM Ideogram 4 FP8 setup, a practical rough estimate would be:
RTX 3060 12 GB       : 11-12 sec/step measured on my setup
RTX 4070 SUPER 12 GB : ~6-8 sec/step rough estimate
RTX 5070 12 GB       : ~4.5-6.5 sec/step rough estimate
RTX 5070 Ti 16 GB    : ~3.5-5.5 sec/step rough estimate
At those estimated speeds, training time would look approximately like this:
GPU                     250 steps      500 steps      1000 steps       1500 steps       3000 steps
RTX 3060 12 GB          ~48 min        ~1 h 36        ~3 h 12         ~4 h 48         ~9 h 35
RTX 4070 SUPER 12 GB    ~25-33 min     ~50-67 min     ~1 h 40-2 h 13  ~2 h 30-3 h 20 ~5 h-6 h 40
RTX 5070 12 GB          ~19-27 min     ~38-54 min     ~1 h 15-1 h 48  ~1 h 53-2 h 42 ~3 h 45-5 h 25
RTX 5070 Ti 16 GB       ~15-23 min     ~29-46 min     ~58 min-1 h 32  ~1 h 27-2 h 18 ~2 h 55-4 h 35
These are not official Ideogram 4 LoRA benchmarks. They are planning estimates.
For a real run, always measure your own average seconds per step after the first cache pass, then calculate:
training time in minutes = steps * seconds_per_step / 60
training time in hours   = steps * seconds_per_step / 3600
The first run may look slower because AI Toolkit has to cache latents and text embeddings. Once caching is done, the step time becomes more representative.
A 16 GB card, such as an RTX 5070 Ti, may also feel more comfortable than a 12 GB card because it can reduce some VRAM pressure. However, if the config still uses aggressive low-VRAM offloading, the speed gain may be smaller than the raw GPU specifications suggest.
PowerShell launcher
A launcher script makes training easier to repeat and log.
Example:
$ErrorActionPreference = "Stop"

$aiToolkitDir = "C:\ai-toolkit"
$configPath = "C:\ai-toolkit\config\mp_scifi_buggy_aitk_500steps.yaml"
$outputDir = "C:\ideogram4_lora_training\mp_scifi_buggy\output_aitk\mp_scifi_buggy_aitk"

New-Item -ItemType Directory -Force -Path $outputDir | Out-Null

$timestamp = Get-Date -Format "yyyyMMdd_HHmmss"
$logPath = Join-Path $outputDir "train_mp_scifi_buggy_${timestamp}.log"

Push-Location $aiToolkitDir
try {
    $previousErrorActionPreference = $ErrorActionPreference
    $ErrorActionPreference = "Continue"

    & .\venv\Scripts\python.exe .\run.py $configPath *> $logPath
    $exitCode = $LASTEXITCODE

    $ErrorActionPreference = $previousErrorActionPreference

    if ($exitCode -ne 0) {
        Write-Host "AI Toolkit exited with code $exitCode."
        Write-Host "Log: $logPath"
        exit $exitCode
    }

    Write-Host "Training completed successfully."
    Write-Host "Log: $logPath"
}
finally {
    Pop-Location
}
Run it from PowerShell:
cd C:\ideogram4_lora_training
.\run_mp_scifi_buggy_aitk_500steps.ps1
Monitoring the training
Follow the latest log:
Get-ChildItem C:\ideogram4_lora_training\mp_scifi_buggy\output_aitk\mp_scifi_buggy_aitk\*.log |
  Sort-Object LastWriteTime -Descending |
  Select-Object -First 1 |
  Get-Content -Wait -Tail 80
Monitor the GPU:
nvidia-smi -l 5
Healthy signs:
- GPU usage is high during training steps;
- loss changes but stays finite;
- no
NaN; - no
CUDA out of memory; .safetensorscheckpoints appear at the configured intervals;optimizer.ptappears in the output folder.
Problem signs:
- loss becomes
NaN; - training crashes during checkpoint saving;
- CPU/CUDA mismatch errors appear;
- no checkpoint is saved despite passing the save interval;
- validation images are completely unrelated to the prompt, which often means an inference or model config issue rather than a dataset issue.
Resuming a training run
AI Toolkit can resume a run if the training metadata is still present.
Keep these unchanged in the yaml file:
- same
training_folder; - same
config.name; - same base model;
- same architecture;
- same rank and alpha;
- same optimizer family;
- same output folder.
To extend a run, increase:
steps: 750
or:
steps: 1000
Then relaunch the same job.
Do not change rank or alpha when resuming a LoRA. If you need to change the network structure, start a new run.
Testing the LoRA in ComfyUI
The validation method should be simple and repeatable.
Use the same prompt and seed, then compare several LoRA strengths:
- no LoRA;
- LoRA at
0.7;
- LoRA at
1.0; - LoRA at
1.5; - sometimes
1.7or2.0for a very small specialized LoRA.
In ComfyUI:
- load
ideogram4_fp8_scaled.safetensorson the conditional model path used by the sampler; - load
ideogram4_unconditional_fp8_scaled.safetensorsif your workflow uses it; - load
qwen3vl_8b_fp8_scaled.safetensorsas the text encoder; - load
flux2-vae.safetensors; - apply the LoRA on the model path used by the sampler.
The important LoRA parameter is usually:
strength_model
Since the text encoder was not trained, strength_clip can usually stay at:
0
In my tests, a properly trained LoRA should usually produce a visible and useful effect around 1.0.
Going above 1.0 is possible, but it does not always improve the image. Higher strengths can make the concept stronger, but they can also reduce visual quality, make the output more rigid, distort details, or push the result too close to the training references.
A practical range is:
0.7-1.0 : subtle or balanced effect
1.0     : good default value for a correctly trained LoRA
1.2-1.5 : stronger concept influence
1.7-2.0 : useful only for some small specialized LoRAs, but visually riskier
For a well-trained general LoRA, I usually expect 1.0 to be enough.
For a focused object LoRA, such as mp_scifi_buggy, values between 1.0 and 1.5 may help if the object is not strong enough. For a very small or very specific LoRA, 1.7 or even 2.0 can be worth testing, but I would not treat those values as the default.
When comparing strengths, do not only check whether the concept appears. Also check whether the image still looks good:
- Are the shapes cleaner or more distorted?
- Does the composition still follow the prompt?
- Are details becoming too repetitive?
- Does the image become too close to the training dataset?
- Are faces, small parts, wheels, hands, or mechanical details degrading?
The best LoRA strength is not always the strongest one. It is the value where the learned concept appears clearly while the image still remains flexible, natural, and visually usable.
Validation prompt: sci-fi buggy
{
  "high_level_description": "A dynamic cinematic render of a rugged sci-fi off-road combat buggy racing across a dusty desert battlefield while armored soldiers fire a mounted machine gun, mp_scifi_buggy.",
  "style_description": {
    "aesthetics": "readable sci-fi military vehicle action scene, polished hard-surface rendering, production-friendly game asset design, tactical convoy energy",
    "lighting": "warm late-afternoon sunlight with dust-diffused highlights, clear readable vehicle forms, dramatic but controlled shadows",
    "medium": "digital vehicle rendering",
    "art_style": "AAA sci-fi vehicle action render with realistic hard-surface construction, oversized rugged tires, exposed suspension, protective roll cage, modular armor panels, open cockpit, rear-mounted machine gun turret, dust trails, and strong off-road motion",
    "color_palette": ["#556B3A", "#2F3437", "#8A7B5A", "#C9A15A", "#111827", "#D8C7A1"]
  },
  "compositional_deconstruction": {
    "background": "A wide rocky desert training ground with beige cliffs, dry scrub, drifting dust, distant industrial sci-fi outpost structures, and a pale sky. The environment supports the sense of speed while keeping the vehicle silhouette easy to read.",
    "elements": [
      {
        "type": "obj",
        "desc": "The mp_scifi_buggy dominates the foreground in a fast three-quarter side view, angled slightly toward the viewer. It has olive-green angular armor panels, a low armored body, oversized dusty off-road tires, exposed suspension, tubular front guard rails, an open side cockpit, black roll cage, and a practical combat utility silhouette."
      },
      {
        "type": "obj",
        "desc": "A helmeted driver sits low inside the open cockpit, gripping the steering controls while the buggy bounces over uneven terrain. The driver is partially framed by the roll cage and windshield canopy."
      },
      {
        "type": "obj",
        "desc": "A rear armored gunner stands braced behind the cockpit, operating a heavy mounted machine gun turret fixed to the rear deck. The gunner leans into the recoil while firing a bright muzzle flash toward the left side of the scene."
      },
      {
        "type": "obj",
        "desc": "A second seated soldier rides inside the side cockpit area, holding onto the roll cage and looking toward the direction of fire. The soldiers reinforce the vehicle scale without distracting from the mp_scifi_buggy."
      },
      {
        "type": "obj",
        "desc": "Dust bursts from the oversized tires, with small rocks, tire tracks, and motion haze behind the buggy to emphasize speed and aggressive off-road movement."
      }
    ]
  }
}
What to check:
- Does the vehicle have a consistent buggy silhouette?
- Are the large wheels present?
- Is the roll cage visible?
- Does the design remain a vehicle, not a tank or spaceship?
- Is the body construction more stable with the LoRA than without it?


Validation prompt: armored supersoldier
{
  "high_level_description": "A polished full-body studio image of a futuristic armored supersoldier, mp_power_armor.",
  "style_description": {
    "aesthetics": "heroic sci-fi armored character, polished game-art illustration, clean standalone figure",
    "lighting": "soft studio lighting with subtle reflections across armor surfaces",
    "medium": "digital illustration",
    "art_style": "AAA game character design with a strong armored silhouette, heavy plating, clean mechanical shapes, full helmet, reflective gold visor, reinforced shoulder armor, plated chest, armored gloves, and heavy boots",
    "color_palette": ["#4B5F36", "#1F2933", "#B08D38", "#0F172A", "#9CA3AF"]
  },
  "compositional_deconstruction": {
    "background": "A plain soft light gray studio background with subtle shading.",
    "elements": [
      {
        "type": "obj",
        "desc": "A single futuristic supersoldier in green powered armor standing centered in a neutral full-body pose, with a reflective gold visor, reinforced shoulder armor, plated chest armor, armored gloves, heavy boots, and military sci-fi design language, mp_power_armor."
      },
      {
        "type": "obj",
        "desc": "The figure fills most of the frame from helmet to boots, with a clean readable silhouette against the simple background."
      }
    ]
  }
}
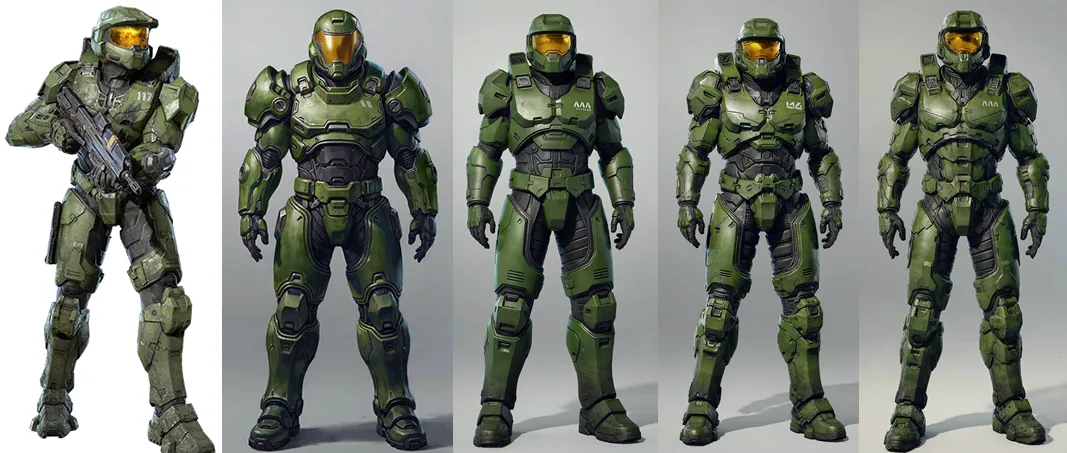
Here, the 800 steps Lora seems satisfying. Note that the trigger keyword can be optional in the final prompt.
Rank choice: solo LoRA vs stackable LoRA
The LoRA rank controls how much capacity the LoRA has to learn and push a concept.
A higher rank is not always better. It depends on how you want to use the LoRA.
Rank 16: stronger solo or main-concept LoRA
Use rank 16 when the LoRA is meant to be the main subject or the main visual identity of the image.
This is useful for:
- a specific vehicle
- a detailed armor design
- a complex character outfit
- a style that should strongly dominate the image
- a LoRA used mostly by itself
In your training yaml file :
network:
  type: "lora"
  linear: 16
  linear_alpha: 16
A rank 16 LoRA can learn more detail, but it can also push the model harder. When two rank 16 LoRAs are stacked, the image may become overconstrained or visually degraded.
Possible symptoms:
- dirty textures
- strange color contamination
- watermark-like artifacts
- over-sharpened details
- reduced composition stability
- both LoRAs fighting for the same visual space
Rank 8: lighter stackable LoRA
Use rank 8 when the LoRA is meant to support another LoRA rather than dominate the whole image.
This is useful for:
- a secondary character
- a reusable outfit
- an accessory
- a style helper
- a concept that will often be stacked with another LoRA
In your training yaml file :
network:
  type: "lora"
  linear: 8
  linear_alpha: 8
A rank 8 LoRA may learn slightly less micro-detail than rank 16, but it often blends better with other LoRAs. For multi-concept scenes, this can produce a cleaner final image.
In practice:
Main object or character LoRA       -> rank 16
Secondary stackable concept LoRA    -> rank 8
General style helper LoRA           -> rank 8 or 16 depending on strength
Highly detailed solo concept LoRA   -> rank 16
Example: vehicle + armor
For a scene with a sci-fi buggy and a powered-armor soldier:
mp_scifi_buggy  : rank 16, used as the main vehicle concept
mp_power_armor  : rank 8, used as a stackable character concept
This can be cleaner than stacking:
mp_scifi_buggy rank 16 + mp_power_armor rank 16
because two strong LoRAs can over-bias the model at the same time, especially when they share similar visual language: military sci-fi, green metal, hard-surface armor, weapons, dust, and battlefield lighting.
Suggested test strengths:
buggy rank 16  @ 0.65-0.80
armor rank 8   @ 0.55-0.80
If both LoRAs are rank 16, start lower:
buggy rank 16  @ 0.45-0.65
armor rank 16  @ 0.35-0.60
The goal is not to make each LoRA as strong as possible.
The goal is to make the combined image clean, readable, and controllable.
Final validation: combining both LoRAs
For the final test, load both LoRAs and adapt their strengths. I made my Loras with rank 16, so
mp_scifi_buggy
mp_power_armor
Start with moderate strengths:
mp_scifi_buggy: (main lora) 0.7
mp_power_armor: 0.35
Final combined prompt:
{
    "high_level_description": "A cinematic sci-fi battlefield production still showing a rugged military buggy drifting across rocky terrain while an armored supersoldier drives through dust and debris.",
    "style_description": {
        "aesthetics": "cinematic sci-fi action scene, heroic military atmosphere, premium live-action game trailer look, dynamic motion, strong silhouette clarity",
        "lighting": "dramatic late-afternoon battlefield lighting with dusty air, warm highlights, soft atmospheric haze, and crisp reflections on armor and vehicle surfaces",
        "photo": "Shot like a high-budget sci-fi film still on a 35mm anamorphic lens, low tracking angle, sharp focus on the buggy and armored driver, subtle motion blur on dust and wheels, realistic lens contrast, slight cinematic grain, high dynamic range",
        "medium": "cinematic photograph",
        "color_palette": ["#4B5F36", "#2F3437", "#B08D38", "#111827", "#6B7280", "#D1D5DB"]
    },
    "compositional_deconstruction": {
        "background": "A wide rocky battlefield with uneven ground, scattered debris, light dust clouds, sparse alien vegetation, distant cliffs, and a dramatic cloudy sky. The scene is dusty and cinematic, with clear open space around the main vehicle silhouette.",
        "elements": [
            {
                "type": "obj",
                "bbox": [260, 90, 850, 900],
                "desc": "A rugged sci-fi military buggy dominates the lower middle of the frame in a dynamic three-quarter front view, angled from lower left toward upper right as it drifts over rough terrain. It has large off-road tires, visible suspension, angular military body panels, an open-frame roll cage, a strong front bumper, armored side panels, and a wide all-terrain combat silhouette. Dust kicks outward from the rear wheels, emphasizing speed and weight."
            },
            {
                "type": "obj",
                "bbox": [336, 378, 624, 583],
                "desc": "A futuristic armored supersoldier is seated inside the buggy in a combat driving pose, clearly visible above the open cockpit. The driver grips the controls with armored gloves and wears green powered armor with a reflective gold visor, reinforced shoulder plates, heavy chest armor, dark undersuit gaps, and a compact heroic silhouette. The helmet and upper torso are readable without covering the vehicle shape."
            },
            {
                "type": "obj",
                "bbox": [170, 547, 409, 828],
                "desc": "A rear-mounted heavy machine gun turret rises above the back deck of the buggy, attached to a sturdy rotating base behind the cockpit. It has a long barrel assembly, dark mechanical housing, protective shield-like side plates, visible mounting hardware, and a short ammunition belt feed. The turret reads as part of the vehicle, not as a separate floating weapon."
            },
            {
                "type": "obj",
                "bbox": [610, 40, 940, 980],
                "desc": "A sweeping dust trail and scattered battlefield debris curve behind the buggy, following the vehicle's diagonal motion across the rocky ground. Small stones, tire marks, and pale dust clouds add speed and cinematic energy while keeping the buggy, armored driver, and rear turret clearly readable."
            }
        ]
    }
}

Final thoughts
The biggest lesson from this workflow is simple: the dataset and captions matter as much as the training settings.
For Ideogram 4, structured JSON captions are especially useful because they let you describe the image in a way that matches how the model understands composition: global description, style, background, and elements.
On a 12GB GPU, the low-VRAM settings also matter. The workflow becomes practical when you keep the batch size small, avoid text encoder training, use FP8, enable offloading, cache what can be cached, and validate the LoRA later in ComfyUI instead of generating samples during the run.
Small specialized LoRAs are also easier to debug than large mixed datasets. A vehicle LoRA and a character LoRA can be tested separately, then combined in one final image to see whether the concepts remain stable together.
This is not the only way to train an Ideogram 4 LoRA, but it is a practical route that can run locally on modest hardware.